Video Tutorial
Aprendiendo a tejer
con Royal Icing
 Lea primero y luego desplácese hasta el tutorial :).
¡Hola!
Aquí puedes ver mi video tutorial sobre cómo tejer con
Royal Icing. El tutorial está en inglés, al igual que todo mi sitio web
aquí, pero traduje el texto del video al español con Google Translate.
Puede leer las dos versiones (inglés y español) debajo del video, y
espero que pueda entenderlo.
Hice este tutorial hace 3 años y
aprendí más. Es por eso que haré más tutorials sobre esta técnica en el
futuro. Así que asegúrese de suscribirse a mi boletín para recibir actualizaciones.
Hay
dos videos más para ver, si lo desea. Uno es sobre la técnica de
quilling de papel, el otro es solo una demostración de cómo decorar una
galleta de búho.
Esto también es para las personas que hablan inglés:
If you're bilingual,
then most people coming to this page
could use your help, I think :).
As you can see, these tutorials/demos are free, just because I like to share my techniques with all of you, so I can enjoy more great cookies from everyone else :-).
Please, if you would like to help your friends to become better cookie decorators, then maybe you could help me translate any future tutorials into Spanish, so I can produce two versions, one for English speakers, and one for Spanish speakers?
Please
let me know through the contact form (I can't give my email on the
website because of too much spam). Or you could contact me through my
Facebook, if you prefer, or leave me a message at the end of the page, if you'd like others to read it as well.
Si tiene preguntas sobre lo que vio aquí, puede publicarlas al final de esta página.
Transcripción
del video
Cómo tejer con glaseado real
(How to Knit with Royal Icing)
Por Sonja Galmad
***
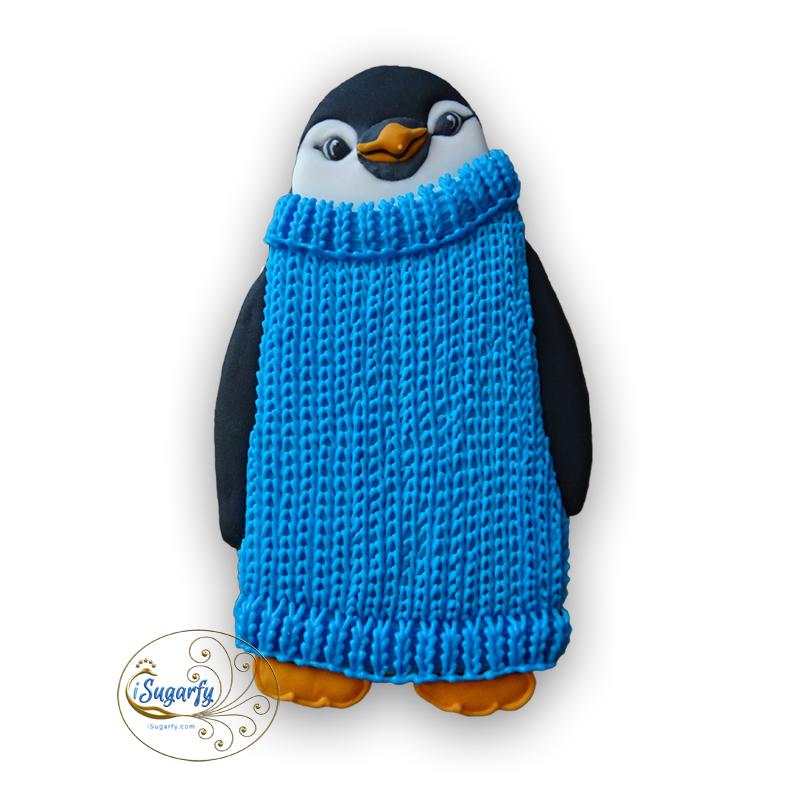
Este video muestra cómo hacer la puntada de punto básica con glaseado real ... en esta galleta de pingüino ...
(This video shows how to do the basic knit stitch with royal
icing… on this penguin cookie….)
***
... que se inspiró en estos pequeños muchachos que recibieron suéteres de punto a través del programa Knits for Nature a fines de la década de 1990.
(… which has been inspired by these little guys who received
knit sweaters through the Knits for Nature program back in the late 1990s.)
***
Normalmente usaría el mismo fondo de color que el tejido en sí, pero lo hice más claro aquí para un mejor contraste.
(Normally I would use the same color background as the
knitting itself, but made it lighter here for better contrast.)
***
La tubería del fondo no tiene que ser perfecta. Tuve un momento incómodo con mi herramienta de escritura que dejó algunas marcas en esta cookie, pero estarán cubiertas .
(The piping of the background
doesn’t have to be perfect. I had an awkward moment with my scribe tool which
left a few marks on this cookie, but they’ll be covered .)
***
Rasgué una guía con la herramienta de escritura para, con suerte, obtener las columnas rectas .
(I scratched a guide with the
scribe tool to hopefully get the columns straight .)
***
La formación de hielo debe ser rígida. — Importante: Lea el texto al final de esta transcripción, por favor.
(The icing should be stiff. — Important: Read the text at the end of this transcript, please.)
***
Uno puede canalizar verticalmente, pero me resulta más fácil horizontalmente.
(One can pipe vertically, but I
find it easier horizontally.)
***
No comencé en el borde exterior, porque está curvado y es más fácil trabajar hacia él.
(I didn’t start at the outer edge,
because it’s curved, and it’s easier to work toward it)
***
Ahí es cuando tendremos que usar tuberías verticales. Ya verás…
(That’s when we will have to use
vertical piping. You will see…)
***
Prefiero trabajar con conos de papel pergamino, tan puntiagudos como puedo hacerlos ...
(I prefer to work with parchment
paper cones, as pointed as I can make them)
***
Pronto aceleraremos
(We’ll be picking up pace soon)
***
Ahora la parte vertical ...
(Now the vertical part…)
***
Líneas horizontales para el tejido de punto del cuello y el borde inferior ...
(Horizontal lines for the rib
knitting of the collar and bottom border…)
***
No tienen que ser demasiado exactos ya que estarán cubiertos en su mayoría ...
(They don’t have to be too exact
since they’ll be mostly covered…)
***
Solo insinuarán la parte de puntada de la costilla que hace punto.
(They will only hint on the purl
stitch part of the rib knitting)
***
¡Uy! Olvidé encender la cámara. ¡Lo siento!
(Oops! Forgot to turn on the cam.
Sorry)
***
Una vez que las costillas se han secado, volvemos a tejerles puntadas de punto ...
(Once the ribs have dried, we pipe
again knit stitches on them)
***
Ahora terminamos ...
(Now we bind off)
***
Y eso es todo lo que hay que hacer. Espero que esto sea útil para algunos de ustedes y se divertirán "tejiendo" sus propias cookies.
(And that’s all there is to it.
I hope this is useful to some of
you and you will have fun “knitting” your own cookies.)
Importante
La formación de hielo no debe ser demasiado rígida. Aún así, deberías poder sacarlo de la bolsa sin lastimarte las manos. Puede ver en la imagen del pingüino que el 2/3 derecho es mucho más irregular que el tercio izquierdo. Esto se debe a que la formación de hielo era demasiado rígida al principio, pero no quería cambiarla porque la cámara estaba grabando. Pero si esto le sucede, ¡corrija la consistencia de la formación de hielo para que no se lastime!
Y tenga en cuenta que esta técnica no se puede hacer con una punta de metal. Tienes que usar conos de plástico o papel sin punta.
Want to keep me motivated to share sugar art tutorials and demos with you?
Yes?


Regresar a CASA desde la página de cookies de punto
Regresar a la página de Cookies tejidas


Translate this page into your language:
Traduce esta página a tu idioma:

Don't worry — your email address is secure with me. I promise to use it only to send you my iSugarfy News.
