How to Store
Royal Icing
Home > Royal Icing - Queen of All Icings > Ideal RI Mother Batch > RI Consistencies (working on it) > How to Store RI
My preferred piping bag for royal icing is a paper cone made of so-called butter bread paper sold here in parts of Europe. It is similar to parchment paper but thinner and less sleek.
The advantages are that it is easy to form into a cone, and a tape will stick to it firmer than to parchment, thus securing the tip better (I'm working on a video to show you how I make my no-fuss piping bags).
The only disadvantage of this paper that I can think of is that it accelerates the natural thickening of royal icing by a multitude. It seems to either absorb some of the icing moisture or be porous, so letting air get in.
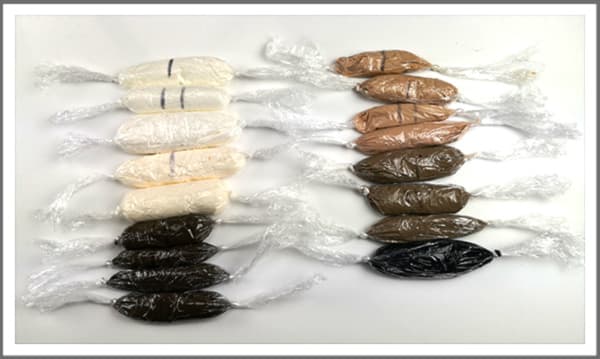
This is the reason I started to wrap my royal icing in saran wrap and to load the piping bags with such "icing cartridges," so to speak. And it really does keep the icing at the initial consistency longer.
This method turned out to have many more advantages. It fast became my favorite way to store royal icing.
The mother batch I divide into manageable portions and wrap them into long sausages. Then I just cut open and squeeze the required amount from one end, twist and tuck that end in, and the rest of the roll goes back into the plastic bag. The next time I need some icing, I cut off the tucked-in end to prevent any crusted pieces from getting into the royal icing.
Since it's better to thicken royal icing with the mother batch than with sugar, it makes sense to always color the stiff icing. And it's also smart to save a good portion of it should we need more of anyone consistency.
For the rest of the colored icing, I freeze it in the consistencies needed for the project, already wrapped into small cartridges that fit into my piping bags.
With a permanent marker, I mark the icing consistency on the "cartridges": I for outline, II for bead, and III for flood, or other markings for in-between thicknesses as needed for a particular project.
If I only need a small amount of flood, I usually just water down what's left of the outline/bead consistency from the piping I did just before. I prefer to pipe with fresh from the freezer outline/bead if I have to continue with them after flooding.
Wrapped with saran and stored in plastic bags, the icing holds about 3 days in the fridge and a month in the freezer. Then it starts to crystalize and is no longer useful for intricate detail work. It still can be used with #1 and larger tips as well as for flood work, though.
I hardly ever put my icing in the fridge anymore, but in the freezer, unless it's a fresh mother batch that I know I will use the next day.
Roll a small frozen cartridge in hands for 2-3 minutes, and it's ready to go. Even a more gigantic sausage of the mother batch won't take too long. Worries of icing going bad on me in the middle of a project are a thing of the past :-).
For projects that I know will take longer than a month, I just never mix colors anymore since it's almost impossible to get the same tint later on. Shades of ready-made colors on the other hand are quite simple to adjust.

This way to learn how I make my no-fuss paper piping bags (working on it)
Want to keep me motivated to share sugar art tutorials and demos with you?
Yes?

Return to the Royal Icing main page
Go to The Ideal Royal Icing Mother Batch
Return HOME from How to Store Royal Icing

Don't worry — your email address is secure with me. I promise to use it only to send you my iSugarfy News.


